Friday 31 January 2014

Little set of bags

As announced in the last post I wanted to sew something easy and pretty. I took the left overs of the syntethic leather as bottom material for two bags and matched it with a light cotton mushroom print. I can imagine them as mother-daughter-partner-look-bags.
The sizes are for the bigger one (28x19x10cm) and for the smal one (22x14x8cm).
The inside is made of thick white cotton fabric to add stability, because the mushroom fabric is very light.
 
Fun, easy, ready in 1 1/2h and I like the result! What more I can expect?!

A bientôt,
Jane

Wednesday 29 January 2014

Not jet content

I promised a friend to make a writing case for her. This hasn't been a good idea! I now know why they are that expensive when you want to buy them!
I didn't use leather, as it is expensive and I wasn't sure about the result. Also I didn't had enough on stock. I used synthetic leather instead. Cheaper and normally easier to handle as it isn't as stiff and hard as real leather.
For the pieces I measured paper blocks and made my own pattern.
Blue is the favorite color of my friend, so I decorated the outside with a patchwork banner and some seams. As the edges of synthetic leather are not so nice, I framed the inside pieces with bias that I cut from blue patchwork fabric.
For the side of the case that holds the pad, my friend wish to have the possibility to put either a college block (slipped in from the side) or a normal block, where the paper is fixed on top (you can see the opening for slipping that in on the piece on top right.
Unfortunately there is no good store for sewing equipment in our region. I couldn't find an endless zipper in the right size, only very thin ones. I had to take the longest coat zipper I could find, but it is still a little short.
The most difficult was to put in the zipper and sew the round corner smoothly.
The whole thing had been a little sloppy in the end, but that I had expected and put in thick carton for stabilization. Now it is stable, but I dislike the little waves in the leather on the surface.
The outside is not in a state that satisfy my, but the inside is quite good.

I am jet not sure if I can give it like this to my friend. Maybe I have a search in the internet if I find a pattern and instructions to make it better.
This project got on my nerves for two weeks now and I need a rest. For the next weeks I will sew easy and pretty things!

A bientôt,
Jane

Wednesday 22 January 2014

Stamping

Last weekend my sons and I made some very simple stamps. We cut squares, rectangles and triangles out of foam rubber and glued them on little wood scraps that are always available in the workshop of my husband.
A while ago I bought a set of 6 ink pads. With all those colors we started stamping away.
My initial idea was to build dream towns. The boys made castles! After we stamped enough squares and triangles we took black pens and draw windows, doors and others:
Want to guess which one is mine?
Especially my younger son (4) can't stop doing this crafting. Since he is producing every day one or two.
Me, I like the scribbling papers on which we stamped off the left over color too.
I think they are quite decorative too. I already turned one drawing and a waste paper into a card. My town is the front and a piece of crazy stamping is on the backside with the text.
I already made a lot of stamps from rubber foam. It is working very well, it costs nearly nothing and it is very easy to make stamps (in all kind of shapes) with kids. I really recommend it as a DIY project with your kids.

A bientôt,
Jane

Monday 20 January 2014

Housing

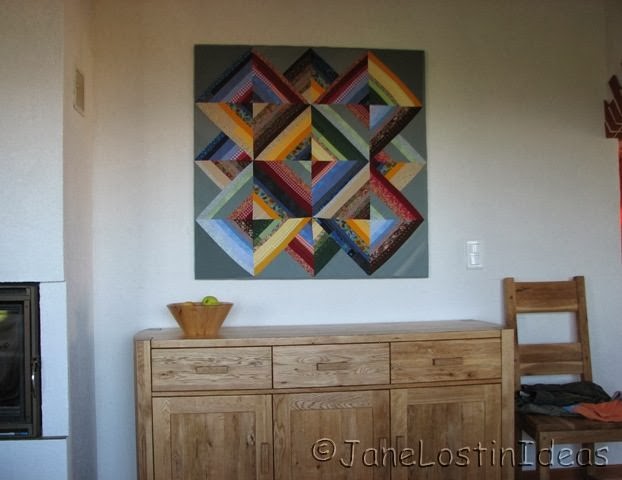
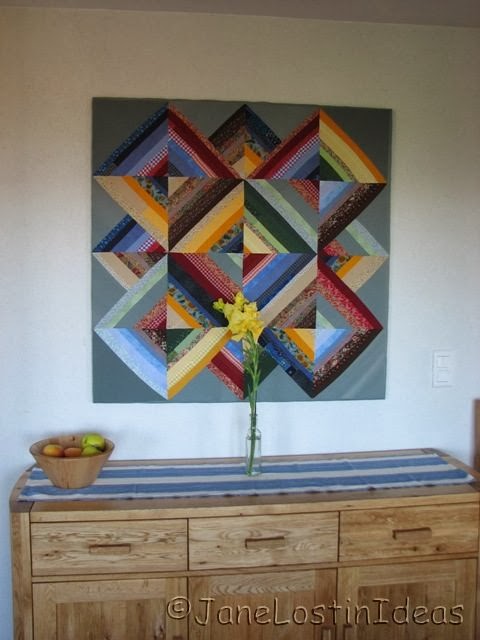
Since we live in our house (soon 5 years) I had problems decorating the living room wall. There is a big blank wall with only the TV-furniture in front. Initially I thought we need something big to hang on the wall, as it is a wide room and includes also the dining table. When coming in the room you are always looking at that wall first. Of course I had plenty patchwork ideas, but as we have already the big colorful other patch hanging on the other side of the room, I don't want to overload the room with fabric.
I wanted a painting, but never found one in the dimensions I had in mind. I tried myself to paint something abstract, but it didn't turn out.
We changed the wall color from white to cappuccino that helped a little.
There has been always something hanging at the wall, but never something we really liked or thought this could stay. Lately there was nothing except some little wooden stars.
I thought about a long shelf all over the length of the room to just put decoration and framed pictures on it or bottles with flowers, changing it regularly - depending on the mood. My darling didn't like the idea and didn't want to install a shelf.
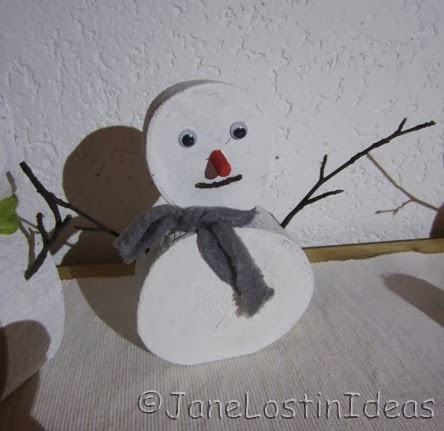
Then 10 Days ago I had an other idea and I have been able to try it out without a mans help. So I went directly to our basement, found an old board and some bars (left from an old lath floor) and started cutting, sanding, gluing and painting ...
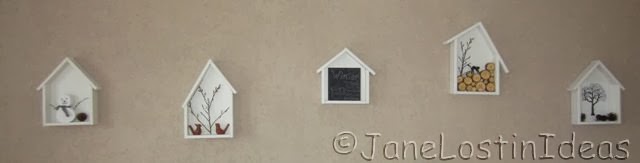
5 little white houses. I made first 3 of them and then again 2 - that's why it took me 10 days. They are 22 cm wide and between 25 cm and 30 cm high. The frame is about 4 cm profound, so you can put something on it.
This is how I decorated it today, but it can be changed whenever I have a new idea or need other seasonal deco.

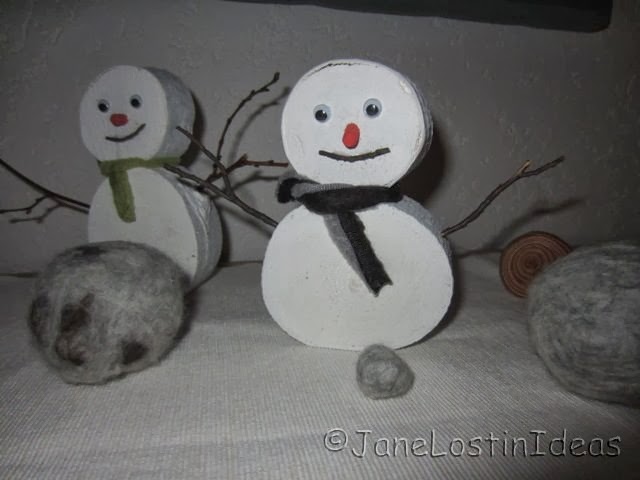
The first one has one of the snowmen's inside that I already showed here.
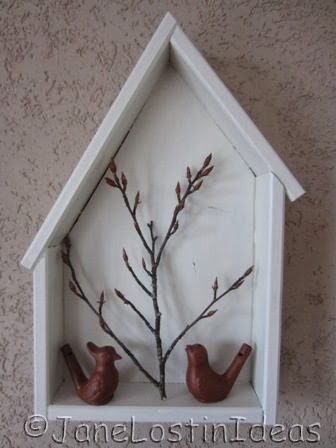
For the second one I took a twig from outside and put two clay birds for company. The birds are whistles that my boys got for Christmas, but the tone is so high that our cat is always hiding when they blow it. So now it is forbidden to use them in the house. It will last longer as deco anyway :-)
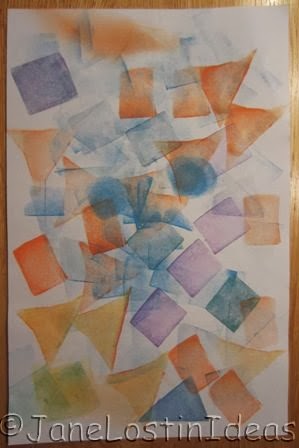
The third one in the row is actually the last one I decorated and I had not many ideas left, so for the beginning it is just a little drawing I made in 10 minutes this afternoon. It will probably change soon.
The forth one houses a stack of wood. I cut the trunk of our Christmas tree in slices and oiled them with olive oil to get out the texture. As the wood has been still very wet when I cut it, I am not sure how it will behalf when drying inside. It will probably crack. I cut a cat out of thick black paper.
In the last house is a drawing I made last year.
For the moment I am very satisfied with this wall! I am looking forward of changing the decoration throughout the year. I will tell about it ....

A bientôt,
Jane

Sunday 19 January 2014

Front door Deco - January

The floor under the Christmas crown that is hanging outside beside our front door, is looking like that:
This is the Christmas crown I made end of November. 
But it's time is over and I it is time for new entrance deco.
I went in the garden to look for inspiration. We have a wild hedge lining one side of our garden and it is always full of ivory. I am pulling out several kilometers each summer, but it is still there. I got some long lianas and wound them to a new crown (not entirely round). I reused the red wooden pearls that have been in the old crown too and added two birds that I bought in the sale last week. Not very colorful and a bit basic, but remember: It is winter. Nothing outside is very decorative in the moment!

Our front door is above the ground, so there are concrete stairs and a platform. I normally have some flower pots there. Big blooming ones in the summer, but now there are only two small ones.

I quickly made this afternoon this little garland, telling the obvious ("hiver" = winter). The pennons are cut out canvas, connected by bias binding and the letters are foam rubber. Should be weather resistant.

A bientôt,
Jane

Saturday 18 January 2014

Header Photo

Yesterday I woke up with a perfect idea in my head what to sew. I already saw the finished product in front of my inner eye. Enthusiastically I started the very afternoon - and what can I say: The result is horrible! Hasn't been a good idea at all. I put it in a dark corner, but I think it is not even possible to recycle it for an other project. I hate putting fabric in the bin! I am one of those who treasure theire fabrics!
So, no new stuff to show here, but I noticed that I didn't jet explained my header photo. That's also a project that didn't ended like I had planned.
It is a patchwork I made 2 years ago, when I decided my scrap box was too full (or is it too tiny?) :-). I cut everything in stripes and sewed long rectangles about 25 by 150cm. Those I cut again in 20 rectangular triangles. I connected the triangles to 5 big squares and added solid fabric for the corners and some leftover smaller triangles for filling up the spaces on the sides.
Above you can see the finished top and you can also see directly the problem: It is not lying flat. In realty it has been much worse. It has been the result of me quitting one ironing step (I will never do again!). So no possibility to turn it into a quilt. After keeping it for a few months in the already mentioned dark corner, I decided to just tension it. My husband made me a frame of 2 by 2cm wooden laths. I first straightened some batting material over it so the wood couldn't rub on the fabric. Then I pulled the moistened patch over the edges of the frame and transfixed it on the backside. It became wonderful straight and since it is hanging in our living/dining room over the sideboard and gives a lot of happy color to the room.
I really love this wall-patch now! So you see not all errors in my sewing projects are leading to lost fabric.
Before I liked to put flowers on the sideboard, but now they are not really visible in front of the colorful background. Can you see the nice gladiolus in front? 


!!
And now it is time for an Anouncement, so you will get a new sewing project to see.
Until end of next week I will make a writing case for a friend of mine.
 !!

A bientôt,
Jane

Wednesday 15 January 2014

Winter kitchen window

I made a new decoration for our kitchen window. I got the inspiration from this blog.
This is the outside view. It is not so easy to make any photographs from the inside, because there are either reflections or you see the outside also - very distracting.
Anyway, this are photos from the inside at night:
The outline of the houses, as well as the trees and the snowmen we cut with a scissor. The windows and doors have been cut with a scalpel. I even let the kids try it. We glued everything with spray glue to the window. My husband said it might be possible to get them off later without destroying them. We will see....


I really like it! 


A bientôt,
Jane


Monday 13 January 2014

Obligation sewing

Today I did some obligatory sewing - no fun. Just the kind of work that is always accumulating. There is always a stack of clothes to repair (normally it's boys trousers)!
It's boring boring boring to fix hangers to a towel and two fleece jackets, directly with family label so it won't get lost at ecole.
I also picked a pyjama trouser of my elder son from the stack. He is growing so fast in height. but staying in all other dimensions skinny as ever. So I just added 5cm in length. It already had a little hole in the knee that I patched with a blue-white star fabric. I used the same fabric on the cuffs. Let's see for how many month it lasts long enough.
Hope you had some more fun projects today!

A bientôt,
Jane

Sunday 12 January 2014

Snowmen inside

I just installed my snowmen decoration on the sideboard and I still love them!

I made them last year at the same time. I had a look at our fire wood and chose some thick branches that havn't been split. Then I cut slices of about 3 cm and attached always two with a wooden pin. I added a pin as a nose and let the kids paint them in white. For more accuracy it has been me who painted the noses in carrot color. I drilled holes and added little twigs as arms. Little twigs are also the mouths, just like you do for real snowmen. I found goggly eyes too.
After they still looked a little naked, so I cut of some leftover pieces of jumper jersey to give them some scarfs. 

Last winter me and the kids also felted some balls for the snowmen to play with. :-)
My sons immediately started playing with them. They normally do play with our decoration, so it is always a bit rustic. Also the arangements are changing from day to day. I call it "living deco".

Saturday 11 January 2014

Hello world


You know how it is with new year resolutions: Normally they are forgotten by February!
But I really feel the need to do some more things than the normal every-day-tasks. I want to explore new ideas in professional and hobby like fields (or both).
I have a lot of ideas, but I also have several handicaps:
- I am afraid of taking chances
- I am lazy, taking preferred the easy way
- I like to find excuses
- I have always a lot of other things to do that seams to be important too
Sounds horribly weak, doesn't it? But my self-knowledge also showed me a back door: all my life I showed best results under pressure. Deadlines are a very good thing for me!
Since 2.5 years I don' have a boss any more who tells me what to do and until when and as my husband is too kind to tell me, I need to find an other force. Last year I founded a sewing circle for some friends who wanted to sew more, but needed advice. It has been fun and also very motivating to try out new technics to show them possibilities. So for example, when I announced to show in the next week what to do with old girls trousers, I finally turned two pairs of trousers into different kinds of skirts, something that I had in mind for years!
So I will now (miss)use this blog to set myself deadlines! I hope that if I announce here to do something, then I will really do so. If not, there is maybe someone out there to remind me and work on my guilty conscience.
So first announcement: I will find out how to upload pictures and show you my winter decoration!

Ahh, probably you want to know more about what I will blog to stay interested? I love to sew (nearly everything, but very few clothes until now) so it's patchworks, quilts, children stuff, deco. I like to craft with paper, wood and other materials. I also want to show my seasonal changing decoration of the house.

As for my person: I am German (36), living in France since 8 years. By now I can read and understand french quite well, but writing ... It would be too much of a challenge to start blogging in french. But comments are welcome in either french, german or english.

A bientot,
Jane