Sunday 30 November 2014

First advent candle

The time is passing so quickly! Today is already the first Advent! I hope you had a nice and relaxing Sunday to get the first feeling of Christmas time. Maybe you spend the day like me and put up some season decoration.
We are traditional and lighten up each of the four sundays one more candle. So today it is only one.
This is my front-door-advent-decoration since six years. I have four wooden candles and each Sunday I add one that is a little smaller. For now it is still a little empty, this is why I put a wooden star, too. 
I made those wooden stars for the Christmas market this year. On a waste pile of a construction site I spotted those nice thick beam pieces that are probably leftovers from the roof construction. I asked if I could have them and fortunately my darling had a keyhole saw blade that was long enough to cut out the stars. 

A few years ago for my first Christmas market I made a lot of candles, as the organizer of the market thought they where so original. In the end that market had been a disaster and I only sold three, but over the years nearly all of them found a new home and I made smaller indoor versions of them too.
Here are all of them together on my basement stairs. Aren't they looking friendly and cheering up the atmosphere? 
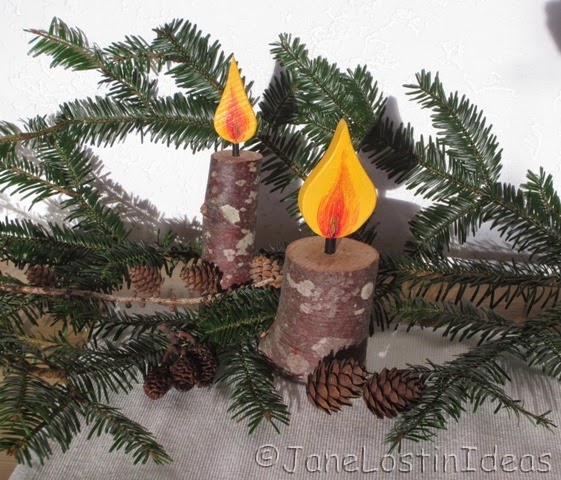
The small ones can be decorated everywhere in the house. With or without green branches. The best thing: they can "burn" the hole day and night without fire risk and the kids can touch them too!

I still love them a lot! It is one of my most favorite decorations ever! Do you like them too? 

A très bientôt,
Jane

Friday 28 November 2014

Bags I'd like to keep

Last week I made a bag with a newly arrived fabric and I like it a lot!
I can imagine to keep it for myself. You can see my hand is already grabbing tightly the handle. I am nearly hoping that nobody wants to buy it (very professional thinking :-)
This is why I made immediately a second one the same size but in other colors.
As turquoise isn't a favorite color, I have at least one bag of this type that I can sell happily :-)

One more bag I made for a client who wanted a music bag for her son to transport and store his notes. I think it is a quite cool bag. Can you see the fabric is full of guitars! I ordered it for this project and took the advantage to buy also some other fabrics in the same store to reasonable the shipping fees (fabric junkies are taking all excuses they can, right?)

I also packed 6 boxes of stuff for the Christmas market tomorrow and it took me hours to put price signs on and get everything in order so that the installation of the stand won't take too much time tomorrow morning. I will show you pictures of the market next week and tell you how many leftover bags I have for myself :-)

A bientôt,
Jane

Tuesday 25 November 2014

Christmas crowns

Yesterday I had a very nice evening with three friends sitting in our basement and making Christmas crowns. I had to make one for a client and I had lots of green branches, so I thought it would be nicer working in company. We had a nice chat and everybody had at least one crown in the end to start Christmas decoration at home.
The first crown I made is for my client. I hope she likes it. It is still very natural and I like it that way. If she wants a bit more, I can add some wooden angels or stars.
It is from fir branches and the flowers and fruits from ivy. I added some red wooden pearls the same color like the candles.
My second crown is already gone to the lady who let me have a stand on her Christmas-market and I forgot to take a picture before.
From all leftover branches I made a very simple crown for our door. I put two birds, an apple and some berries (wooden pearls), so it is not only Christmas style but can stay for the winter (or at least until it looses too much needles) on our front door. Do you think I have to add something to the upper half? Maybe some snowflakes?
When I finished the crown decoration this morning I found a crown I made from birch twigs a while ago. I sewed quickly a little bird and put it in. It will go with me to the market on Saturday.
I still have lots to do for the Christmas market, so I better hurry up ... 

A bientôt,
Jane

Thursday 20 November 2014

Tidy up the fridge

Do you know that situation: You have loads to do, but then you are doing something completely unimportant?
This has been me, tidying up the fridge from the outside this week. 
I got every papers down from it, cleaned the body and rearranged all papers worth keeping. Therefor I marked zones with washi-tape for the different topics. On the front a big zone for recipe and below there are some post-cards. On the side there is the yearly calendar with birthdays and vacations on it in the big blue area and below two zones where the boys can pin their latest drawings, invitation cards and others. Between there is still some free space for coupons and so on.
I hope it stays a bit tidy for a week or two :-) and I will now do some reasonable things...

A bientôt,
Jane

Saturday 15 November 2014

Doudou mouton (sheep)

Look who escaped from my sewing room and has now a great time on a patchwork meadow!
Two pillow-sheep!
 They are so alike that I call them Dolly and Molly!
They love each other, but they are also waiting for two nice children that might adopt them and cuddle them all the time and lay their head onto the soft fur (cotton) for the night.


A bientôt,

Bergère Jane

Friday 14 November 2014

Tutorial: little leather cases

Here comes the promised tutorial about how I sew leather pouches. Either as pencil cases or as make-up cases or as little pouches for whatever you want to put inside!
The idea of sewing them like this has it's origin here, I just made some additions.

Step 1: Like always you have to chose your material first. For a make-up case it is a piece of leather about the size 18x35cm. For pencil cases it is 50cm length and the height can vary depending on the height you want for your case (about 12cm is fine). You will also need a piece of endless zipper that is about 2cm longer than your piece of leather, a zipper foot and a decorative ribbon.
Step 2: Open up the zipper on the hole length, you will only need half of it. (Therefor I propose to sew always two cases at the same time) I use fabric glue to fix the zipper along the long side of the leather at the outside. Make sure that the zipper teeth are  not covered by leather and that the sipper is with the right side up. On the downside the zipper teeth are on one level with the edges, on the front they are a bit higher.
Step 3: When the glue is dry, sew the ribbon onto the leather along the zipper covering the edges of the zipper.
Step 4: Fold the leather in half and fiddle on the zipper foot. Therefor I fix the leather with a clip to have my hands free for the zipper. It is working easiest, when the zipper on one side is a little shorter than on the other side. Slide the zipper foot on the longer side. When the foot is on the same height add the second side into it. Normally with a little pull the zipper foot slides on easily.
Step 5: Fix the zipper end with some zig-zag-stitches so it won't rip off again. Then open the zipper at least half, turn the left side of the leather out and close the two open edges. I use these paperclips instead of needles to hold the two layers in place. 
Step 6: At the downside corners, fold the leather so that the side seam is on the bottom seam. This is only working easy at one side. At the other side you don't have a side seam. There you have to fold the leather and mark the fold with a non permanent marker. Mark a line rectangular to the bottom seam. For my beauty case I made the line 4cm long. Sew on the line and cut of the triangle in the corner. 
Step7: Turn the case and you are ready!
You can do those cases with all materials that are not fraying. For example canvas. 
Also you can add what ever application you like to the body before you come to step 4. 
I like this method very much, as it is fast and you have a clean finish. Working with leather I like to have as few seams as possible. When sewing seams that are through more than one layer of leather, the stitches are sometimes not very even, but in the end this is not visible as all those seams are inside. 
I hope this tutorial is useful to you. Have fun trying out!

A bientôt,
Jane

Wednesday 12 November 2014

Productive day

Today I have been very busy! ... and also productive! :-)
In the morning I prepared the material: choosing colors and combinations, cutting and fixing the zippers with a little bit of glue ...
And after lunch it only took me 1,5h to sew everything together: 3 make-up-cases, 1 belt-pouche (sample copy) and 11 key-ring pendants!
I love this little pockets you can hang on your key-ring to put in a little money for the parking, or a chip for the shopping caddy or whatever ... I just tried them out yesterday and think they are very nice little gifts for Christmas. They are only about 6-7cm long so it is a bit fiddly to make them, but after the fourth or so I got the turn ...
I also made some pictures to explain my method to make this little leather cases. I already announced here that I would do ... So next time there is a little tutorial!

A bientôt,
Jane

Friday 7 November 2014

My writing case!

Yesterday I made an other writing case and this time it is for me! Not that I have a lot of time to sew for myself in the moment, but I needed a writing case to show to potential clients and I can use it in the meantime :-) 
Since I made this case, I had already requests for some others.

I cut of a very nice batik fabric that I have since years only using it in very small pieces. The closing and decoration button have been made by my sister in law.
For stabilization I used a A5 Ring binder where I took of the binding mechanism. (22x24cm) For the closure I now wished I had used velcro, this is a more stable way to close the case, but when I looked at it before putting all pieces together I didn't want anything to destroy the flower look and a button seamed to be lighter.
Inside on the right I have a college block for commands, things I have planned, lists of material, ... On the left there are three slots for putting in papers, cards, advertising, ... Also there are two possibilities to fix pencils. I tend to note everything on little scrap papers and often I have to search for them in the chaos of my sewing room - now everything could be in order (if I get used to put everything always in the new case)

A bientôt,
Jane

Wednesday 5 November 2014

Pasta and Co.

From a piece of beige thin felt, I made pasta:
Which I sorted and packaged today. 
"What do you like to eat for dinner? Farfalle, Tagliatelle or Ravioli?"
I will sell them in sets for play kitchens on a Christmas market end of the month together with little fishes and bonbons - nice mixture if you have to eat it in real, isn't it?

For making shopping easier I sewed a bunch of little tote-bags (20x20cm):
I think that this will go well together with the other children's cooking equipment (here and here). 

A bientôt,
Jane

Monday 3 November 2014

Baby-Star-Quilt finished

I didn't jet showed you the finished star quilt I made for my youngest niece that is now born. Welcome and have a happy and healthy life little one! 
I made these photos after washing the quilt so you can already see the uneven surface. I used a cotton filling, as I don't like polyester for babys, so there is always shrinkage. 
The backside is white molleton fabric - so soft! I quilted the stars with straight lines and all the rest with a meandering line and little free-hand stars.

The finished quilt size is 90 by 90 cm. Enough to nestle down the little girl in it.

A bientôt,
tata Jane