Monday 28 March 2016

Easter table decoration

I have seen something like that on pinterest and saturday I quickly build a box from scrap wood of my husbands workshop and painted it shabby white. It is about 65cm long and 7cm wide. The little glasses are from baby compott and in the middle a taller glass. Some are pots filled with soil and I planted little flowers and two are filled with water and little flowers my youngest picked in the meadow.
Between the vases I put moss and litte deco elements: a nest with some wooden eggs, a snail-house, a broken egg-shell and two knittet rabbits my mom made for me, when I was little.
The little biscuit rabbits that you can see on the first and last photo are since some years my standards for Easter. They are hopping around everywhere, as you can see here.

HAPPY EASTER - FROHE OSTERN - JOYEUSES PAQUES !!!

Jane

Saturday 26 March 2016

Basic Easter decoration

I made a quick and easy Easter decoration from blown eggs, jersey worms and little crowns I wound from birch twigs. They are hanging on each window and some at the wall and one on the dining table lamp.
I really like it. It is so simple, but containing the basics of Easter.
Now I go out and look for some flowers to decorate the table. We are having splendid garden weather. The weather forecast is announcing something else, but I still hope it stays like this for tomorrow.

A bientôt et joyeux paques,
Jane

Thursday 24 March 2016

Divided bag with closure

One of my sewing students asked if it might be possible to make a divided bag where each half can be closed by itself. I wouldn't have thought about a closure like she suggested, but I took the challenge and started thinking and sewing and more thinking and after a lot of fiddling I managed to finish a bag:
Don't ask me how I got the two compartments together. I just hope I remember how it worked tonight, when there is sewing class. 
By the way, my student wanted her bag to be her all-day-go-to-work-bag. She wanted it closed and divided as she had to take always a second pair of shoes with her, so it had to be big and she don't want everybody in the tram to see what else is in it. I hope I managed to invent her perfect every-day-bag. I will link it to greenfietsens bag challenge, where this month topic is the every-day-bag.
This is also the last bag I will do with this fabric. If you are following my blog since a while, you have probably seen quite some bags out of it. I found 3 or 4 meters of it a while ago in the reduced price box at the swedish furniture store and since I use it for many bags and for test objects of beginner students and finally I am really tired of it. Glad there are only very little scraps left over :-)

A bientôt,
Jane

linked at: bag-challenge-mars at greenfietsen

Wednesday 23 March 2016

Calendar page March

This is the page for march from my personal 2016 Calendar:


A bientôt,
Jane

Thursday 17 March 2016

Chicken with dangling legs - tutorial

Chicken of this kind are very pleasant in keeping. They are easy company, totally clean and friendly with children. They are staying at their place except they are following the children in their games.

Whereas the birth of those chicken is a little tricky and I hope this tutorial is clear. Try it out!

Material:

  • 2 squares 15x15cm for the body         
  • 1 square 10x10cm for the tail
  • 1 square 6x6cm for the spout
  • 2 quadrants with 7cm radius for the head (optional)
  • Zig-zag-ribbon as ruff (optional)
  • 2 black buttons for the eyes
  • Felt for crown and jowl
  • 2 about 20cm long ribbons fort he legs
  • 2 perls for the feets (optional)
  • Batting (not on the foto)
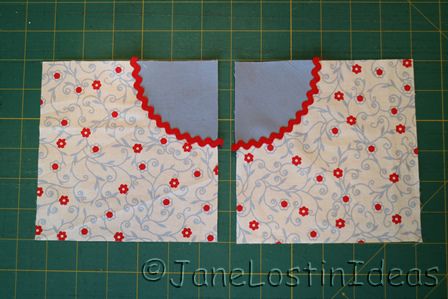
Preparation head (optional):
You can make those chicken also without extra marked head zone, but I like them better with.
Therefor you iron the quadrants with Flisofix on one corner of each body square and cover the edge with the zig-zag-litz.
If you want it more easy you can cut out the quadrants with a zig-zag scissor that gives a likewise effect.

Preparation tail, spout, crown and jowl
From felt you cut out a crown and a jowl. Remember that about 0,7cm of it will be later in the seam allowance and cut accordingly bigger.
For the tail fold the 10x10 square in half and then both closed corners to the opposite middle. Best if you iron the folds.
For the spout you are doing the same as for the tail and in the end you fold it in half. The long (open) side of the triangle is the downside.

Head:
On the seam allowance of the head, fix the prepared pieces spout, crown and jowl. The jowl should only slightly go over the ruff and stick a bit into the downside of the spout. If you put the jowl only under the spout, there will be a big distance between the two visible afterwards because of the seam allowance and that’s not so pretty.
Now you put the two body squares over each other - right sides facing each other and the head zones are together.

Sewing the body:
Close the following seams:
1. The back seam of the chicken, that means the seam where is also the crown.
2. The front of the chicken, that means the seam where is the spout and jowl.
3. The belly of the chicken, that means the seam that is opposite of the back. Leave    in the back half a turning opening of 3-4cm.
Have a look if spout and crown are correctly fixed. It happens easily to close in the crown into the front seam.
I propose to actually close first the back seam and do this from the top of the head to the back. The two other seams can be closed together also starting at the point of the head. 
I used a red thread so the seams are better visible on the foto.

Chest and legs:
Now you place the front seam over the belly seam and fix it with a needle. Rectangular to those seams you mark a line that is about 6cm long that means 3cm on each side of the seams.
Put the leg ribbons from the inside with one end into the marked line so that they are about rectangular to that line. Fix them with needles.
Sew along the marked line.
Verify if the ribbons are correctly placed and fixed with the seam.
Later it should look like this:

Tail:
To not catch the leg ribbons with the seam of the tail, I propose to pull them out of the turning opening.
Place the back seam over the belly seam to get the pyramid form.
Add the tail by fixing it centric and between the two layers.
Close the tail seam. 
Later it should look like this:

Finish:
Turn the chicken, stuff it, close the turning opening and sew on the eyes!
Fix the pearls to the end of the legs and your chicken is ready!

The most fun you will have with a whole chicken run:

Friday 11 March 2016

Sewing kits

For my sister in law's birthday I have been looking for all-in-one packages for sewing projects. She likes to sew, but having few time with job and little child. I thought it would be nice for her having projects that she can just begin without looking for materials and explanations before.
I couldn't really find what I was looking for. The kits have been either too simple or stuffed animals. I had been hoping for a fancy bag, but couldn't find a kit with pattern, explications and material. Finally I put three kits together myself.
First I prepared my tutorial for little bags (have a look here), layouted it for a paper version and cut out the fabric.
Then I found a nice ebook for balloon-covers that I bought, tested and then cut out pieces for 2 balls. I had those covers for my boys too. They are very handy, because small, to take with you. If your kid wants to play you just put a balloon inside the ball-cover, blow it up and you are having a great ball.
The third project is a decorative chicken. I have been sewing plenty of those. I now made another one, taking pictures and writing a tutorial. I will give it to you too in one of my next posts, maybe you want to make some before Easter.
Now my sister in law is prepared for whenever she has an hour for herself to start quick a project, that I guarantee will turn out well. She liked her present though...

A bientôt,
Jane

Wednesday 9 March 2016

A simple yoga-mat-bag

I have been ask, if I would like to come to an open door yoga day in our village and maybe selling some bags and other yoga equipment. Very kind to ask me, but I have no idea about yoga. So I started slowly and first made a very simple bag for transporting the mat.
The diameter is 17cm and you can put in a mat that is 65cm wide (what seems to be the normal size). I have seen that there a mats with different thicknesses, but 17cm diameter should be okay for all.
The bottom is made from synthetic leather to give stability and it's easy to keep clean.
It is also stable, when you open it and pull out or put in your mat. (I don't have a mat and had to put something else in for testing)
This is only a basic bag. I have some ideas for more advanced (and more expensive) bags. But first I have to show this one to a yoga person to see if it can be accepted.

bientôt,
Jane

linked at greenfietsen bag-sew-along where is every month another topic for sewing a bag. As I am sewing lot's of bags any way, that is a perfect link-party for me to join. Topic for february has been sports bags (clic)

Sunday 6 March 2016

Calendar page February

Do you remember that I told you beginning of the year of the calendar I made for my parents? I had planned to show every month one page, but I completely forgot about it last month. 
It's a little late, but have a look at the February page:

bientôt,
Jane

Friday 4 March 2016

Multiple divided baskets and a good advice

Can I give you an advice that might be helpful? Don't plan, measure and cut for an untested project when having great headaches!
And maybe you shouldn't make your notes and calculations on a small piece of paper like I did last Wednesday:
Because if you do so, you might end up sewing two projects instead of one!
I planned to make another divided basket, this time with two dividers and using the technique I detected for the picnic bag. After planning the final dimensions, making a little (or better: tiny) drawing, calculating the sizes of the pieces to cut and cutting, I happily began the sewing and ended up with a nice inside basket, divided into 3 sections like planned (only two compartments have been 1cm longer than I wanted, because my head wasn't capable to divide 13 by 2) and a nice outside basket. And only when I wanted to combine the two, I recognized that one was about 13cm longer than the other! I forgot to add the width of the basket to the calculation of the outside pieces! Stupid headache - next time I do mending socks, when my brain is taking a timeout.

Anyway, today I cut again and produced a simple divided interior for the small outer basket and a large outside for the double divided inside basket. 

The long one is for our bathroom to tidy up all the things that are always lying around on the wall tray.
I don't regret having the other one too. It is a spare present and I think I knew already who will get it.

A bientôt,
Jane

Wednesday 2 March 2016

Airplane dragon

This weekend I have been away, all on my own. During the flight I tried to do some drawings. It had been a bit shaky, so I used a pencil and had to erase often. Inspiration was the movie we watched with the kids the evening before I left: "how to train your dragon". Mine didn't resemble to any of those in the film and somehow he has a dog-face... Also I am not sure he can fly with those dragonfly wings!

A bientôt,
Jane