

Finally here comes the promised tutorial for my scrappy baskets and bags! Those are great to use up lots of scraps. See all of my bags and baskets I made with this technic here, here and here.
And now I'll get started with lots of photos and explanations:

While connecting the scraps you should already know the size of your bag, especially the circumference. For this smaller model it has been about 80cm. To not have repetions of the same fabric in two neighbor rows, I avoid to use the same scraps I had in the first 80cm of my scrappy chain in the following 80cm.
You also need one band of scraps a little longer than your circumference for the bottom row. It won't be very visible, so don't use your nicest scraps.
The length of the scrappy ribbon depends on height and circumference of the planned bag. You can calculate like this: height/2,3*circumference
It's not necessary to iron the bands before starting the sewing. If the fabrics had been ironed before cutting, it should be fine. I did baskets with an extra ironing step and without and it didn't made a difference.
You already decided which size your basket or bag will have and now you cut the lining from a stable fabric and the same size a layer that should add stability to the bag, but you won't see it later. I already used all kinds of materials for that: a quilted fabric, blinds (those worked great) or tarpoline. Two layers of rigid fabric work too and of course professional stabilising bag material.

In my example the grey fabric is the lining and the white is the rest of an old window blind (thin, but rigid). They measure 81cmx32cm. This is a smaller bag than my big shopping basket.
On the stabilisation fabric you need to mark a line. On the right side it is 1cm from the edge on the left side 3,5cm. This mark helps to get the right inclination by sewing the first row of scraps. Those measures don't change, no matter what size you bag or basket will have!
Close the side seams (small sides of the rectangles) of both pieces separately.

Put the two cylindrical tubes one into the other, the seam allowances hidden between. You don't need to align the seam allowances, it is even better, when they are not at the same place.

Here you see where the line you marked before met.
Sewing the body: For it is easier to understand I divided the beginning in two steps, but you can do the next two seams in one go.

Take your short scrappy band (mine is only grey) and sew it with the right side up once around the cylinder along the line.
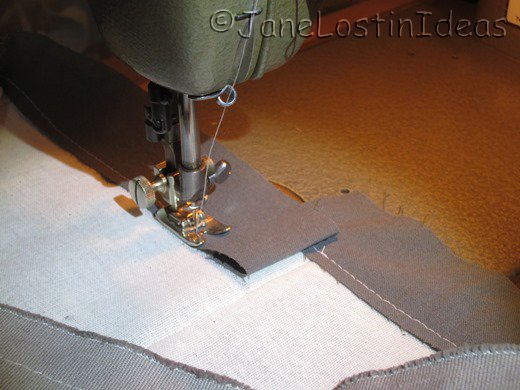
When you reach again the beginning of the loop, fold the end of the band under and finish the seam with a little overlap to the beginning.

Now you start with your long scrappy ribbon. With the left side up you place it exactly over the band you just fixed. The beginning is overlapping a bit the end of the first band and you should fold over the beginning for a cm or so.

Keep sewing until you nearly finished the first loop.

Fold the beginning of the scrappy ribbon over its seam allowance. It should become a prolongation of the first round ribbon.

Continue sewing down the scrappy band while folding over band you fixed in the round before.

Like this it is going round and round and round the basic cylinder.

I have a table machine so I have to deal with the cylinder going over the top of my machine. For the most normal machines it works easier to have it under the food plate (or how does the arm where you are sewing on calls?). In any case, if you are doing a bag, you will need to fold or roll the part of the body you already finished in order to fit under the machine arm.

Slowly you will arrive on the upper edge.

When you reached the edge, don't stop sewing. Continue for nearly one tour following the edge that you can only divine under the scraps of the row before.

End the seam and the scrappy band.

Fold the scrappy ribbon all up ...

... and then fold it over as a binding. Fix it and sew it down from the lining side

Now you already have a clean upper edge of your basket body.

For the bottom you need to decide which form it should have (round, oval, rectangular) and make yourself a pattern for it. I have to confess that I didn't really understand how to calculate the perfect size for the bottom. The bottom hasn't the same outline length as the circumference of the cylinder, but how much bigger it has to be exactly I can't calculate. Believe me I tried! But somehow logic isn't working in this case. Let me know if any of you knows the secret.
For this bag the bottom is a rectangle 28,5cm x 16,5cm with round corner that have a radius of 5cm.

You need to prepare a 3 layer sandwich with at least one stable fabric. I took the lining fabric on top and on below and in the middle a scrap of molleton.


Finally add a binding bias around the lower edge. Sew first from below in the bend of the opened bias tape. As there are quite some layers to cover, let the bias hang 2-3mm over the edge.

Fold the bias tape over the edge. Make sure it covers the seam.

Sew on the binding.

As a very last step, add some handles to your basket. For my shopping baskets I always did, for the smaller ones I didn't.

Et voila ... !
My latest bag!
I hope you understand everything and enjoyed this tutorial. Write it in the comments if there is something unclear! Thanks!
A bientôt,
Jane
Jane
No comments:
Post a Comment